

Help center
Start selling your photos on ZebraSnap
From sign-up to your first sale: create a photographer account, set up how you get paid, create and publish an album, and share it. Which countries can receive payouts.
How it works
ZebraSnap is free to start. You upload your event photos, we recognize faces and bib numbers so athletes find themselves in seconds, they buy, and the money reaches your bank automatically. We only earn a commission when you sell. See Commissions and fees.
1. Create a photographer account
Sign up and choose Photographer under I am a.... You can register with email or with Google, Apple or Facebook.
Already signed up as an athlete? Use Become a photographer on your dashboard, or switch it in Settings → Account.
If another photographer invited you, enter their code when you sign up: you get a welcome bonus. See Rewards and referrals.
2. Set up how you get paid
Open Settings → Receive Payments, choose your Account country and follow the steps. It takes a few minutes and you can do it before or after uploading photos, but you need it to publish a paid album.
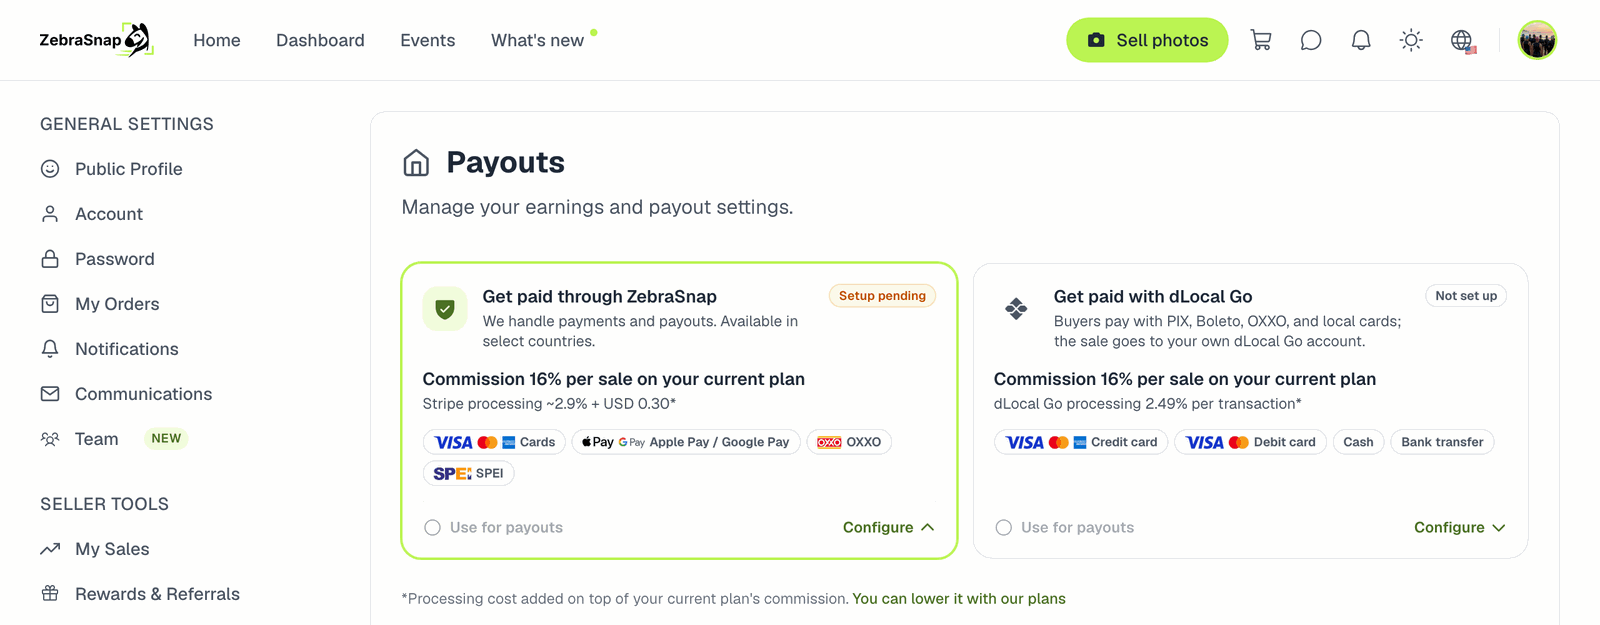
- Get paid through ZebraSnap (Stripe): available in around 100 countries, including the US, Canada, Europe, the UK, Australia, Japan, Mexico and most of Latin America. Stripe asks for your identity and your bank account, then pays out to that account automatically.
- Get paid with dLocal Go: for some Latin American and other countries, including Brazil. See Sell with dLocal Go.
If your country doesn't appear in the list, neither option supports it yet and you can't receive payouts from ZebraSnap. Tell us in the chat bubble: we use those requests to decide which countries to add next.
When payouts arrive: When do I get paid?
3. Create an album
Go to My Albums and tap Create Album. You pick where and when the event happened, choose the event (or create it), then name the album and set the price per photo. Full walkthrough: Create and publish an album.
4. Upload your photos
From the web, the desktop app, the mobile app, SFTP or Lightroom. Pick the right one for your volume in How to upload photos. Faces and bib numbers are recognized automatically after upload.
5. Publish and share
Tap Publish album, choose the recognition options and confirm. Once published, Share gives you the link, a quick way to post it on WhatsApp, Facebook, X and more, and an Instagram Story image.
Share the link where your athletes are: the race's social media, running club groups, your own profile. Most sales happen in the first days after the event.
Tips for a strong start
- Publish fast. Athletes look for their photos the same day or the next one.
- Price with care. Look at what other photographers charge for the same event. Very low prices can end up below the minimum a card payment allows (about US$0.50).
- Offer a bundle. A discount for buying several photos, or a fixed price for all of someone's photos, lifts the average order. See How discounts work.
- Protect your work. Your previews are watermarked and protected by default. See How we protect your photos.
- Keep your albums on a paid plan. On the Free plan, albums without recent sales are archived after a while. See Plans and limits.
Related articles
- Plans, prices and limitsWhat each ZebraSnap plan costs and includes: commission, storage, free photos, custom domain, video recognition and team seats. How to upgrade, cancel, and what happens to your albums on the Free plan.
- The ZebraSnap apps: mobile, desktop and LightroomWhat you can do in the iPhone and Android app, the Mac and Windows desktop app and the Lightroom plugin, and where to download each one.
- Your account: sign-in, password, email and profileSign in with email, Google, Apple or Facebook; set a password for the Lightroom plugin when you signed up with Google; change your email or language; edit your public profile; and delete your account.
Still need help?
Can't find what you're looking for? Our team is happy to help.